Figure and ground
Graphic design is the art of using form and color to successfully convey a message, but this is not as easy as it sounds. The design process is one of trial and error, and it often takes many iterations to create a design that clearly communicates what you're trying to say. Although we tend to think of this process as something involving gut instinct, experienced designers have an ever-expanding checklist of visual relationships that helps guide them through to the final result.
We begin our journey into the field of graphic design by looking at the first item on this checklist: The relationship between a figure and its ground. In the following, we will use a single rectangle to demonstrate how three simple variables – position, size, and rotation – can be manipulated in code to create a variety of different expressions. Although this can seem rather basic, these relationships are crucial ingredients in most successful designs, and they also happen to be a great way to introduce the concepts of visual communication.
Position
Most written languages have a natural reading direction. In a majority of the Western world, characters are arranged in horizontal lines, and we read from left to right, top to bottom. This tells us that the position of a shape can be used to guide the eyes of a user through a design. Graphic novels use the positioning of captions to guide the reader through the storyline, and most newspapers float quotations to visually separate them from the body text.
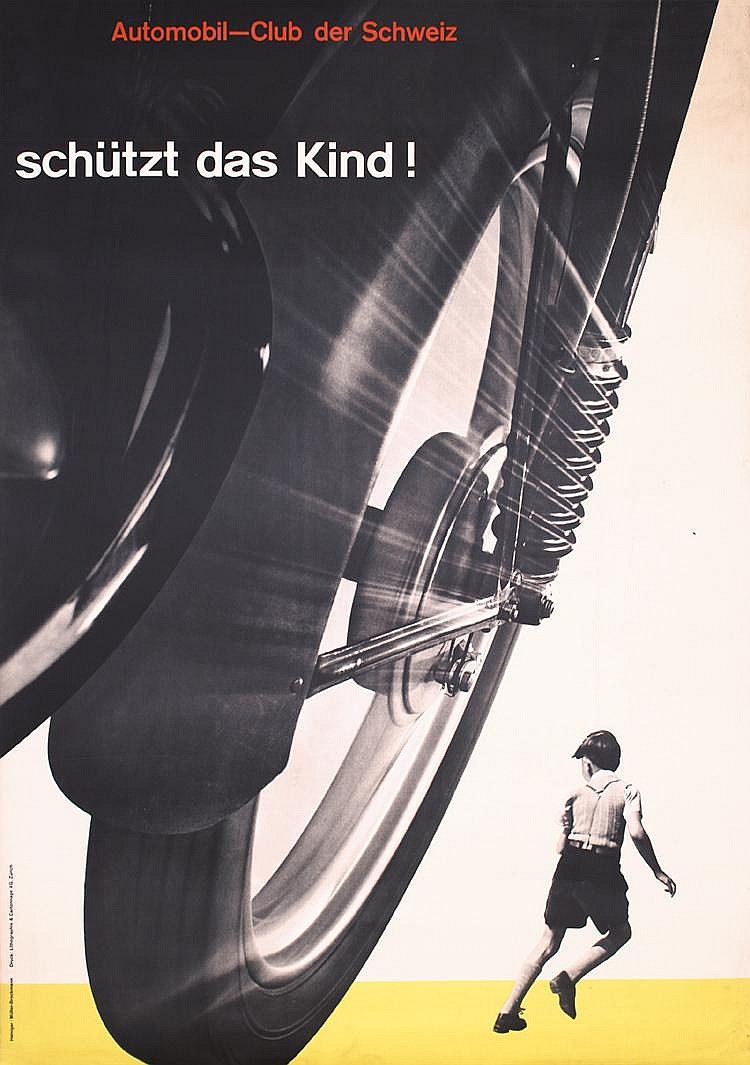
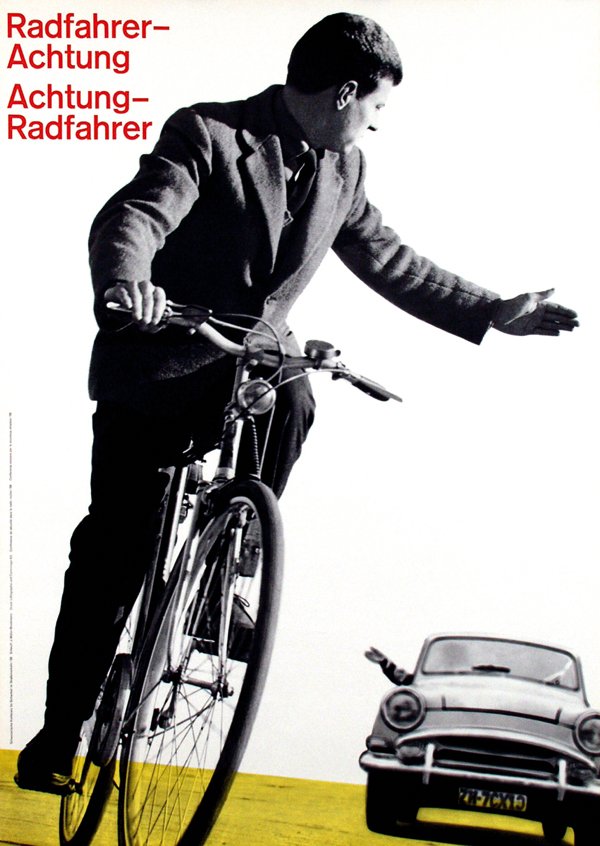
In these posters for Swiss Auto Club, Joseph Müller-Brockmann uses position (and size) to prioritize certain shapes. In the first poster, the vehicle in motion is prioritized over the running child. This heightens tension and makes it apparent that the vehicle is on a collision course with the child. In the second poster, the hand-signaling cyclist is the first shape on the page, which achieves exactly the opposite effect.
We use the rect() function to draw a rectangle with P5, and the first two numbers passed to this function determine the position of the shape within the canvas. If these numbers are both zero, the shape will appear in the top left corner, and higher values will draw it further to the right (x) and bottom (y) of the canvas. This makes it easy to position shapes in code, and many graphic programming languages work this way.
Instead of randomly typing numbers until a shape is in the right position, it can be beneficial to use simple math to calculate the position of the shape based on the size of the canvas. This will define the relationship between the canvas and shape explicitly in your code, and make it easier to scale the design. As an example, take the following image.
This design could be achieved by using numbers slightly smaller than the canvas for the x and y position of the rectangle. However, was I to change the width of the canvas, the rectangle would no longer show up in the right place. I would need to change the x position of the rectangle to reflect the new canvas size.
This is fixed in the code below, where the width and height variables are used to dynamically calculate the position of the rectangle. To calculate the x position, we start at the right edge of the canvas (width), then subtract the size of the rectangle (100), and finally subtract the gap we want between the edge of the canvas and the rectangle (25). The same formula is used for the y position.
rect(width - 100 - 25, height - 100 - 25, 100, 100);Size
By increasing the size of important shapes and decreasing the size of less significant shapes, you can bring clarity to a design. This is a pattern we encounter daily in everything from traffic signs to headlines in an article.
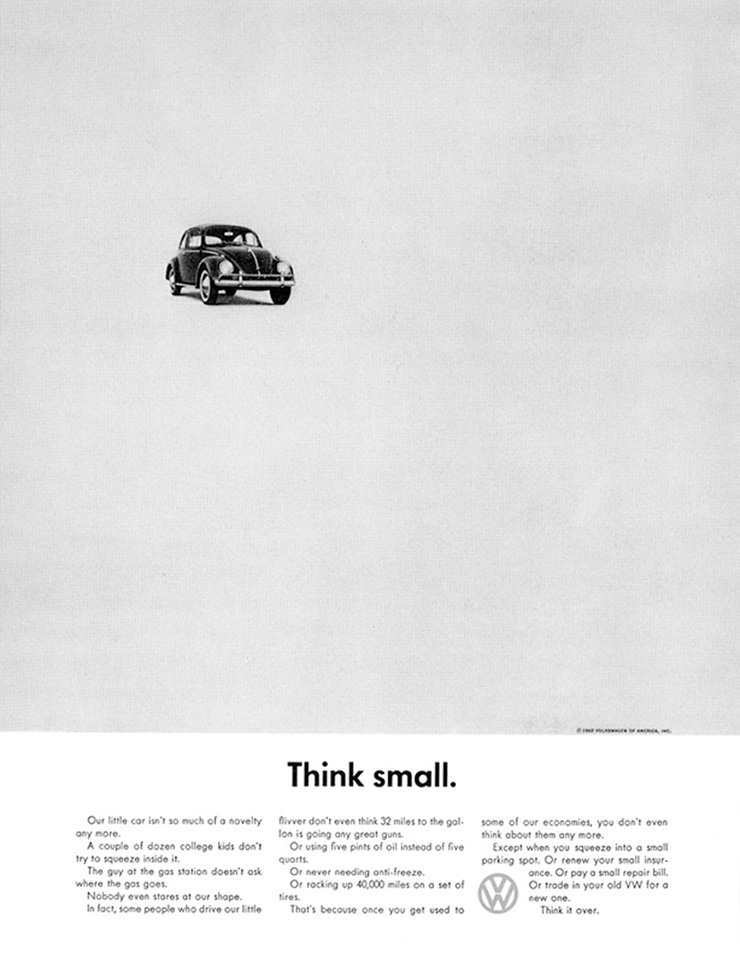
The Think Small advertising campaign from 1959 is a great example of how size can be used to emphasize supporting text copy. In this series of magazine ads, an image of the Volkswagen Beetle is printed in different sizes within an otherwise empty canvas.
The third and fourth number passed to the rect() function define the width and height of the shape. Like the position, it can be beneficial to calculate the size of the rectangle dynamically based on the size of the canvas. Building on the example from above, the following code shows a truly dynamic design, where the static numbers used for size and spacing have been replaced by calculations. Now, both the position and size of the rectangle scales with the canvas automatically.
rect(width - (height/3) - (width/20), height - (height/3) - (width/20), height/3, height/3);However, there is one big problem with the code above: It has become very hard to read. If you need to change the position of the rectangle, it will take you a while to mentally parse what's going on. To solve this problem, it is often helpful to use variables at the top of your code to store these numbers. This makes the code more readable, which makes it easier for you (and other programmers) to change it later on. The following code produces the same design, but all numbers are now saved into variables with names that clearly communicate their purpose.
const size = height / 3;
const margin = width / 20;
const x = width - margin - size;
const y = height - margin - size;
rect(x, y, size, size);
Keeping your code organized is very important, especially as you start to make designs with more than a single shape.
Rotation
When you rotate a shape, the whitespace around it changes, and this can be used to make a shape appear active or in motion.
Rotated shapes can be found in many design products: Books written for children often use rotated shapes to create fun and playful designs. Popular magazines use rotated grid systems to make the content look less dry, while publications for a narrow audience might enforce horizontal and vertical lines to imply quality of the content within.

The rotate() function takes a single number, which is expected to be the desired rotation in radians. A radian is a mathematical unit of angular measure based on the radius of a circle. If you follow the outline of a circle for the length of its radius, that angle is 1 radian. By the magic of numbers, a full circle is therefore 2π (or about 6.283) radians. For those not interested in the intricacies of PI, the radians() function can be used to convert degrees to radians. All of the following lines of code will result in a rotation of (about) 90 degrees.
rotate(PI/2);
rotate(1.57);
rotate(radians(90));
When you use the rotate() function, you are not rotating individual shapes, but the entire canvas. Because all shapes are drawn on the canvas, they just happen to rotate too. Combined with translate(), which moves the starting point of the canvas, it's possible to achieve exactly the kind of rotation you want.
As an example, let us suppose we want to add rotation to our rectangle example from above. Here, we have added a single rotate() function before drawing our rectangle. Notice how the canvas (represented by the darker box) is rotating around its own beginning, not the rectangle.
const size = height / 3;
const margin = width / 20;
const x = width - margin - size;
const y = height - margin - size;
rotate(radians(10));
rect(x, y, size, size);
If we want the rotation to happen around the top left corner of our rectangle, we have to do something that might feel a bit unintuitive. First, we have to move the canvas to the position of our rectangle by using the translate() function. After calling the rotate() function, we then draw our rectangle at the top left corner of the translated canvas. As you can see, the rotation now happens around the rectangle.
const size = height / 3;
const margin = width / 20;
const x = width - margin - size;
const y = height - margin - size;
translate(x, y);
rotate(radians(10));
rect(0, 0, size, size);
As we dive into more layout techniques, we will further investigate how to use translate() and rotate() to make more sophisticated designs.
Designing a word
A good way to practice these relationships is the ‘design a word’ exercise. Pick an adjective from the dictionary and make a design for it by changing the position, size, and rotation of a single rectangle. This helps you build one of the most fundamental skills in graphic design: The ability to create visual relationships that make sense for your content.
The following example demonstrates the exercise for the word steep. How would you make a design for this word using just a rectangle and the three variables? Look for connections between the word and your variables, and you might notice that steepness and rotation are related: You can make the rectangle appear like a steep hill by rotating it. By changing the size, you can make that hill longer, continuing outside the canvas. By changing the position of the rectangle, you can create asymmetric whitespace, making sure that the user notices the rectangle. The following sketches demonstrate these steps in code.
The following examples show a few more designs to be used for inspiration. Keep in mind that not all adjectives will be this straight-forward, so you might find yourself longing for more shapes. That is the subject of the next chapter, so do not worry.
This chapter demonstrates an approach that will be a continuing theme throughout this book: We will take topics from graphic design theory, understand how these ideas can be implemented in code, and practice these concepts through exercises. Although this was just the first step into the world of graphic design, the relationship between a figure and its ground is important. It is common to find problems in existing designs that can be traced back to this relationship, whether it's a user interface that fails to emphasize an important button, or a graph with ambiguity around its underlying dataset. Remember not to rush to make things pretty, and make these concepts a crucial part of your design process.
Exercise
Pick a random adjective from the dictionary, and write a sketch that tries to convey that word by changing the position, size, and rotation of a single rectangle. Do this for a couple of words, and ask friends to guess the word-image combinations.